HSA Dental Implants: What Patients Need to Know

Yes, you can use HSA funds to pay for dental implants — as long as the treatment is medically necessary. That is the IRS standard, drawn from IRS Publication 502 (Medical and Dental Expenses) and IRS Publication 969 (Health Savings Accounts and Other Tax-Favored Health Plans): expenses that restore function qualify; purely cosmetic work does not. In practice, a single-tooth implant replacing a missing tooth almost always clears that bar. The catch is plan-level interpretation. Your HSA administrator has some discretion in how it applies these rules, and certain components (crowns, bone grafts) may require a Letter of Medical Necessity before reimbursement is approved. Keep itemized receipts from day one.
Table of Contents
- How the IRS determines whether your implant qualifies for HSA funds
- Which implant costs qualify and which ones do not
- What records your HSA administrator and the IRS expect
- How to actually pay: HSA debit card vs. pay and reimburse later
- Timing your contributions and reimbursements across multiple years
- HSA vs. FSA vs. HRA: which account works best for implants?
- Why claims get denied and how to avoid it
- What to confirm before you book the procedure
- Two real-world examples showing how reimbursement works
- Key Takeaways
- The case for treating documentation as part of the procedure itself
- Plan your implant costs and HSA reimbursement with Implantveneerguide
- Useful sources and further reading
How the IRS determines whether your implant qualifies for HSA funds
The legal test comes from IRS Publication 502, which defines a qualified medical expense as one that diagnoses, treats, mitigates, or prevents disease or affects a bodily function. Replacing a missing tooth restores chewing function and prevents bone loss, so it qualifies. A procedure done purely to improve appearance does not. That distinction is the entire eligibility framework.
LegalClarity’s IRS-based analysis confirms that implants qualify when they restore function, and that preparatory procedures are generally eligible when medically necessary. Publication 969 adds the HSA-specific timing and contribution rules that govern when and how you can draw funds.
Beyond the IRS test, four criteria must all be true before a reimbursement is valid:
- Medical necessity: The procedure addresses a functional impairment, not a cosmetic preference.
- HSA established first: Your account must have been open on or before the date of service. You cannot open an HSA after the fact and retroactively cover an earlier expense.
- No double-dipping: The expense cannot already be reimbursed by insurance, an FSA, or any other tax-favored account.
- Documentation in hand: Itemized receipts, provider name, service dates, and amounts are required. Some administrators also want an Explanation of Benefits (EOB) if insurance touched the claim.
Confirm eligibility with your HSA administrator before you book. Some custodians have stricter documentation requirements than others, and a quick call before treatment is far easier than an appeal afterward.
Which implant costs qualify and which ones do not
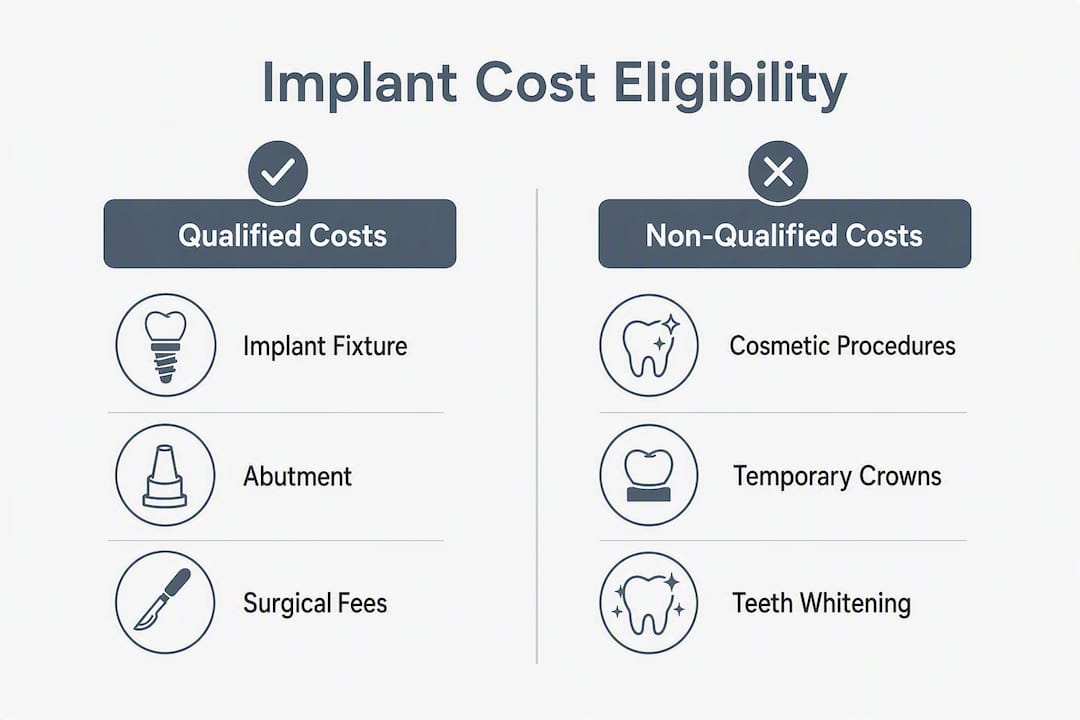
Most of the line items on a typical implant bill are HSA-eligible. HSA Vault and LegalClarity both confirm that the implant fixture, abutment, and crown are eligible when the work is restorative, as are the preparatory procedures that make implant placement possible.
Typically eligible without additional documentation:
- Implant fixture (the titanium post)
- Abutment (the connector piece)
- Implant crown (the visible tooth)
- Bone grafting when bone loss makes implant placement impossible
- Sinus lift procedures
- Tooth extractions required before implant placement
- Pre-surgical CT scans and imaging
- Sedation or anesthesia when medically necessary for the procedure
Conditional — may require a Letter of Medical Necessity:
- Crowns placed for cosmetic reasons rather than structural need
- Implant-supported bridges where the cosmetic component is significant
Not eligible:
- Teeth whitening
- Veneers placed purely for appearance
- Cosmetic contouring with no functional purpose
- Elective cosmetic procedures bundled into the same visit
A typical implant bill might look like this:
| Line Item | Typical Cost Range | HSA Eligible? |
|---|---|---|
| Implant fixture/post | $3,000–$6,000 | Yes |
| Abutment | $300–$500 | Yes |
| Implant crown | $3,000–$6,000 (for all visible tooth/crown components collectively) | Yes |
| Bone graft | — | Yes (medically necessary) |
| CT scan / imaging | — | Yes |
| Sedation/anesthesia | — | Yes (when required) |
| Teeth whitening | — | No |

Ask your dentist to itemize every line on the treatment plan with procedure codes. That document becomes your primary evidence for reimbursement.
What records your HSA administrator and the IRS expect
Documentation is where most claims fall apart. MetLife’s HSA guidance is explicit: qualifying services must be designed to treat or prevent disease, and administrators can request a Letter of Medical Necessity for ambiguous treatments. Build your file before the procedure, not after.
Core documents to keep for every implant reimbursement:
- Itemized statement from the provider showing procedure descriptions, CPT/CDT codes, dates of service, and amounts charged
- Proof of payment (bank statement, credit card statement, or canceled check)
- Explanation of Benefits from your insurer if dental insurance applied to any portion
- Pre-surgical treatment plan if the procedure was staged across multiple appointments
- Imaging or diagnostic reports if bone loss or functional impairment is the clinical basis
When to request a Letter of Medical Necessity (LMN):
An LMN is a written statement from your dentist or oral surgeon explaining why the procedure is medically necessary rather than cosmetic. It should include the patient’s diagnosis, the functional impairment being addressed, the ICD-10 and CPT/CDT codes, and the recommended treatment. You need one when the procedure is inherently ambiguous (a crown that could be read as cosmetic), when your administrator specifically requests it, or when the claim involves a component that is not obviously restorative.

Pro Tip: Request the LMN before or at the time of service, not after a denial. Getting it retroactively is possible but slower, and some administrators will not accept a backdated letter.
How to actually pay: HSA debit card vs. pay and reimburse later
Two payment flows work for HSA dental implants. Which one fits depends on your cash flow and whether you want credit card rewards.
Option 1: Pay with your HSA debit card at the clinic
- Confirm your HSA balance covers the full amount before the appointment.
- Verify the dental clinic accepts HSA debit cards (most do, but confirm).
- Swipe the card at checkout. The transaction record serves as proof of payment.
- Keep the itemized receipt the clinic provides. The card statement alone is not sufficient documentation.
- File the receipt in your HSA records folder immediately.
Option 2: Pay out-of-pocket and reimburse yourself later
- Pay the clinic with a personal credit card or bank account (a rewards card works here).
- Collect the itemized receipt at checkout.
- Log into your HSA administrator’s portal and submit a reimbursement request, uploading the itemized receipt and any EOB.
- Processing times vary by administrator — some pay within a few business days, others take two to three weeks.
- The reimbursement lands in your linked bank account or is transferred back to your HSA debit card.
Pro Tip: The rewards-card approach lets you earn points on a $3,000–$6,000 purchase while still getting the HSA tax benefit. Just check your HSA balance before you pay the clinic — if you submit a reimbursement request for more than your current balance, the distribution fails and you may owe taxes and a penalty on the excess.
As LegalClarity notes, paying with a rewards card and submitting the itemized receipt for reimbursement is a widely accepted approach — the key is keeping that receipt.
- Confirm your administrator accepts digital uploads (most do now, but some still require mailed forms).
- Note the reimbursement deadline your plan imposes, if any.
- Store receipts digitally in a dedicated folder; paper receipts fade.
Timing your contributions and reimbursements across multiple years
Dental implants, particularly full-arch cases, often cost more than a single year’s HSA contribution limit. The good news: you are not required to reimburse yourself in the same year the expense occurred. GrowingFamilyBenefits explains that you can pay for extensive work now and reimburse yourself as you add new contributions over subsequent years, with documented receipts as the only requirement.
The one non-negotiable: the HSA must have been open on the date of service. Open the account before any procedure, regardless of the balance at that point.
| Strategy | How It Works | Best For |
|---|---|---|
| Same-year reimbursement | Pay and reimburse within the plan year | Patients with sufficient HSA balance |
| Multi-year reimbursement | Pay now, reimburse across 2–4 years as contributions accumulate | Full-arch or staged implant cases |
| QHFD (IRA-to-HSA transfer) | One-time tax-free IRA transfer up to annual HSA limit | Older patients with IRA savings |
Key rules for multi-year reimbursement:
- Keep every original itemized receipt. You will need it to substantiate the distribution in a future year.
- The reimbursement amount in any given year cannot exceed your HSA balance at the time of withdrawal.
- There is no federal deadline for how long you can wait to reimburse yourself, provided the HSA was open when the expense occurred.
A note on financing: some dental offices offer 0% promotional financing. GrowingFamilyBenefits warns that deferred-interest programs can impose retroactive interest charges above 25% if the promotional balance is not fully repaid on time. That retroactive interest is not HSA-eligible, and it can wipe out the tax savings you were counting on. Read the financing terms before signing.
HSA vs. FSA vs. HRA: which account works best for implants?
All three account types can cover medically necessary dental implants, but they behave very differently when the bill is large and the treatment is staged.
| Feature | HSA | FSA | HRA |
|---|---|---|---|
| Carryover | Unlimited | Limited (plan-dependent maximum) | Employer sets rules |
| Portability | Yes — yours to keep | No — tied to employer | No — employer-funded |
| Reimburse later | Yes — no deadline | No — use-it-or-lose-it | Depends on plan |
| Contribution source | Employee + employer | Employee + employer | Employer only |
| Best for large bills | Yes | Only if timed carefully | Depends on employer |
For patients planning major restorative work, an HSA is the strongest tool. The unlimited carryover and the ability to reimburse yourself years later make it purpose-built for high-cost procedures. An FSA can work if the procedure falls within the plan year and the balance is sufficient, but the use-it-or-lose-it rule creates real risk for staged treatments that span a calendar year. An HRA depends entirely on what your employer allows, so check the plan document.
When an FSA makes sense for implants: If your procedure is scheduled and fully paid within a single plan year, an FSA can cover the same costs as an HSA. The risk is timing. A staged implant that starts in November and finishes in March crosses two plan years, and the FSA balance from year one may not carry over.
For a deeper look at how insurance interacts with these accounts, the dental insurance and financing guide at Implantveneerguide walks through which portions of a bill each account type typically covers.
Why claims get denied and how to avoid it
Denials are almost always preventable. The most common reasons:
- No itemized receipt. A credit card statement showing “Dental Office — $4,200” is not sufficient. Administrators need procedure descriptions and codes.
- Procedure classified as cosmetic. If the claim description does not clearly indicate restorative intent, the administrator may reject it.
- Double-reimbursement. The expense was already covered by insurance or another account.
- HSA not open at time of service. The account was opened after the procedure date.
- Missing LMN. The administrator flagged the procedure as ambiguous and the patient had no supporting letter.
Non-qualified distributions carry a 20% penalty plus ordinary income tax on the withdrawn amount. That penalty disappears after age 65, but the income tax still applies. The IRS can audit HSA distributions, and without receipts, you cannot prove the withdrawal was qualified.
If your claim is denied: First, request the denial reason in writing. If the issue is documentation, obtain the LMN from your dentist and resubmit with the full itemized statement. If the administrator classified the procedure as cosmetic, ask your dentist to provide a clinical note explaining the functional impairment. Most administrators have a formal appeals process, and a well-documented appeal succeeds more often than the initial claim.
Pro Tip: Keep a dedicated folder — physical or digital — labeled with the procedure date and provider. Drop in the itemized receipt, EOB, LMN, and proof of payment the day of service. An audit-ready file takes five minutes to build and can save you thousands in penalties.
What to confirm before you book the procedure
A ten-minute call before scheduling prevents most of the problems above.
Ask your HSA administrator:
- Does this procedure require preapproval or a prior authorization?
- What documentation format do you require (itemized receipt, EOB, LMN)?
- Do you accept digital uploads through the portal, or do you need mailed forms?
- What is the typical reimbursement processing time?
- Is there a deadline for submitting reimbursement requests for this plan year?
Ask your dentist or oral surgeon:
- Can you provide an itemized treatment plan with CDT/CPT codes before the procedure?
- Will you write a Letter of Medical Necessity if the administrator requests one?
- If the treatment is staged, can you bill each phase separately with its own itemized statement?
- Does your office accept HSA debit cards directly?
Before the appointment:
- Confirm your HSA balance covers the planned payment (or the reimbursement you intend to claim this year).
- Know exactly how to submit receipts to your administrator.
- Set a calendar reminder to file the reimbursement request within a week of the procedure, while the documents are fresh.
The dental implant consultation checklist at Implantveneerguide covers the clinical questions to ask at the same appointment, so you can handle both the medical and financial documentation in one visit.
Two real-world examples showing how reimbursement works
Example 1: Single-tooth implant
A patient needs one implant after losing a molar. The total bill is $4,800, broken down as: implant fixture ($1,500), abutment ($400), crown and visible tooth work ($1,600), bone graft ($500), CT scan ($300), and sedation ($500). All components are medically necessary and itemized on the provider’s statement.
The patient’s HSA balance is $3,200. She pays $3,200 with her HSA debit card at the clinic and covers the remaining $1,600 with a rewards credit card. She submits a reimbursement request for $1,600 the following month after contributing an additional $2,000 to her HSA.
At typical marginal tax rates, the amount paid through HSA funds can save a significant portion in federal income tax compared to paying with after-tax dollars. State tax savings may apply on top of that, depending on the state.
Documents kept: itemized provider statement, HSA debit card transaction record, credit card statement, reimbursement confirmation from administrator.
Example 2: Full-arch (All-on-4) across multiple years
A patient needs full-arch restoration on the upper jaw. The total cost is large, and the HSA balance and annual contribution limit for a self-only HSA plan are considerations in planning reimbursements over multiple years. The patient pays the full $28,000 out-of-pocket using a rewards card and plans to reimburse himself over several years.
He continues this pattern until the full $28,000 is reimbursed. The original itemized receipt from the treatment date is the document that authorizes every future withdrawal. Without it, none of those reimbursements are defensible.
Documents kept: original itemized provider statement (all $28,000), rewards card statement showing payment, LMN from oral surgeon, annual reimbursement confirmations from HSA administrator.
For current price ranges on full-arch procedures, the dental implant cost guide at Implantveneerguide provides updated U.S. figures broken down by procedure type.
Key Takeaways
Dental implants are HSA-eligible when medically necessary, and the multi-year reimbursement strategy makes even full-arch cases manageable with careful documentation and consistent annual contributions.
| Point | Details |
|---|---|
| HSA eligibility confirmed | Implants qualify under IRS Publication 502 when they restore function, not for cosmetic purposes. |
| Keep itemized receipts always | A credit card statement alone is not enough; you need procedure codes, dates, and provider details. |
| No deadline to reimburse yourself | You can reimburse years later as long as the HSA was open on the date of service and receipts exist. |
| FSA is riskier for staged work | Use-it-or-lose-it rules make FSAs a poor fit for treatments that span two plan years. |
| Implantveneerguide tools help | The Cost Estimator and consultation checklist help you build the itemized documentation administrators expect. |
The case for treating documentation as part of the procedure itself
Most patients treat the paperwork as an afterthought. That is the single most expensive mistake in HSA planning for dental implants. A $28,000 full-arch case reimbursed over four years represents real, compounding tax savings — but only if the original itemized receipt survives. Lose that document, and every future reimbursement becomes legally indefensible, regardless of how legitimate the expense was.
What I find underappreciated in most HSA guides is the asymmetry of effort here. Getting the documentation right takes about 20 minutes: request the itemized statement at checkout, scan it, and drop it into a labeled folder. Recovering from a denied claim or an IRS audit takes weeks and sometimes requires legal help. The math is obvious, yet most patients still walk out of the clinic with only a summary receipt.
The staged reimbursement strategy for full-arch cases is genuinely powerful. Paying $28,000 out-of-pocket and recovering it over four years through HSA contributions is not a workaround — it is exactly how the IRS designed the system to work. The clinician-reviewed checklists at Implantveneerguide are built around this reality: they prompt patients to collect the right documents at the right moment, before the procedure is complete and the dentist’s office has moved on to the next patient.
One more thing worth saying plainly: the LMN is not a bureaucratic formality. It is the document that converts an ambiguous claim into an approved one. Get it before the procedure, not after a denial letter arrives.
Plan your implant costs and HSA reimbursement with Implantveneerguide
Knowing the rules is one thing. Applying them to your specific procedure, timeline, and HSA balance is where most patients get stuck.
Implantveneerguide’s Cost Estimator generates a provisional itemized breakdown by procedure type — the kind of line-by-line document that HSA administrators actually want to see before approving a reimbursement. Pair that with the Candidacy Checker to understand which procedures apply to your case, and you have the two documents that make the pre-appointment conversation with your administrator far shorter. The financial planning guide covers how to coordinate HSA contributions, insurance coverage, and staged financing across multiple years — the full picture for anyone facing a large restorative case.
This article provides general educational information about HSA rules and is not tax or legal advice. Confirm current IRS rules and your plan’s specific requirements with your HSA administrator or a qualified tax professional before making financial decisions.
Useful sources and further reading
The guidance in this article draws on primary IRS documents and several well-sourced benefits references. Here is where to go next:
- IRS Publication 502 — Medical and Dental Expenses: The primary IRS document defining which medical and dental expenses qualify. Read the dental section specifically for implant-related eligibility.
- IRS Publication 969 — Health Savings Accounts and Other Tax-Favored Health Plans: Covers HSA contribution limits, timing rules, qualified distributions, and the QHFD provision for IRA-to-HSA transfers.
- LegalClarity — Can I Use HSA for Dental Implants?: Clear IRS-based analysis of implant eligibility, preparatory procedures, and reimbursement timing rules.
- MetLife — HSA for Dental: Explains administrator documentation requirements and when a Letter of Medical Necessity is appropriate.
- GrowingFamilyBenefits — HSA Rules for Dental Implants: Detailed walkthrough of multi-year reimbursement strategy and warnings about deferred-interest financing.
- HSA Trackr — Is Dental Implants HSA-Eligible?: Cost range examples and tax-savings calculations for single-implant cases.
- HSA Vault — Is Dental Implants HSA Eligible?: Eligibility reference listing implant components and common inclusions and exclusions.
- Implantveneerguide — Financing Options for Dental Implants: How to coordinate staged financing with HSA reimbursements over multiple years.
A note on plan-specific rules: IRS publications set the federal floor, but your HSA administrator and employer plan can impose additional documentation requirements or processing rules. Always confirm the specifics with your administrator before treatment — the sources above describe the general framework, not your plan’s exact terms.